Lab: DNS

Introduction

Today we will add a DNS server to our virtual lab. We will use the domain example.com which is reserved for testing. By building our own DNS server we will no longer need to maintain hosts files on every node.

Here is what we will build today


Warning

This lab should be considered an "Advanced Cookbook".


Grading:

You will demonstrate your understanding of this lab by completing an Canvas quiz.


Part A: Setup The Lab

Because we are adding a server and a network today's lab will have a relatively complex setup process. Don't panic, we'll guide you through it step by step.

  1. Import the appliance which contains w01, y01 and s01.
  2. Clone s01 to create ns1 (Remember to "Reinitialize MAC addresses of all network cards")
  3. Add a second Network Interface Card (NIC) to ns1 this NIC MUST be of type NAT
  4. Configure ns1
    1. Set the IP address on enp0s3 to 10.1.1.40
      nmcli connection modify enp0s3 ipv4.addresses 10.1.1.40/24
      nmcli connection up enp0s3
      
    2. Network manager should have automatically configured enp0s8 to be a dhcp client. We'll check to be sure.
      1. Ping google's name server
        ping 8.8.8.8
        
      2. If this ping fails. Stop the lab and contact your instructor.
    3. Set the hostname

Part B: Configure ns1 as a Resolver (Caching Name Server)

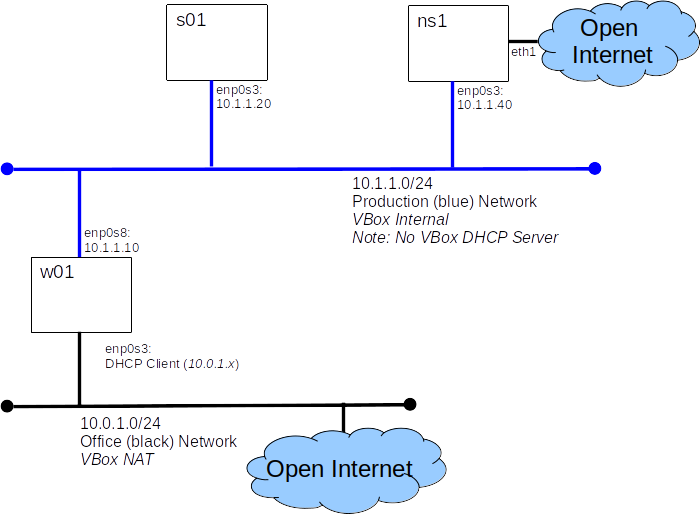
ns1 will be our DNS server, but won't "know" about servers beyond our control, so it needs to be able to support "recursive quires" - that just means, it needs to know about other DNS servers who can answer questions about hosts for which it is not authoritative.

The good news is, this is the default configuration that ships with our name server software (bind).

  1. Open the ports needed for a DNS server
    firewall-cmd --permanent --add-port=53/udp --add-port=53/tcp
    firewall-cmd --reload
    
  2. Install the Berkley Internet Name Domain software (bind)
    yum install bind
    
    yum install bind-utils
    
  3. Modify the default named configuration file /etc/named.conf
    1. Tell named to listen for packets addressed to 10.1.1.40
      listen-on port 53 { 127.0.0.1; 10.1.1.40; };
      
    2. Tell named to allow queries from anyone on the 10.1.1.0/24 network
      allow-query     { 10.1.1.0/24; localhost; };
      
  4. Start the name server, and set it to start at boot
    systemctl start named
    systemctl enable named
    
  5. Check our work from s01
    1. Install the named utilities
      yum install bind-utils
      
    2. Tell the system where to look when resolving DNS queries. Classically name servers are listed in /etc/resolv.conf. They still are, but NetworkManager populates /etc/resolv.cnf based on which connections are up.
      nmcli connection modify enp0s3 ipv4.dns 10.1.1.40
      nmcli connection up enp0s3 
      
    3. Perform a lookup with nslookup
      nslookup www.google.ca
      
    4. Perform a lookup with dig
      dig www.google.ca
      
    5. Lookup the name server ns1 (this is expected to fail)
      nslookup ns1.example.com
      
      How'd the lookup of ns1.example.com go? Answer

Part C: Configure ns1 To Be An Authoritative Server for example.com.

  1. Modify /etc/named.conf to tell named that we will be Authoritative for example.com. by adding...
    zone "example.com" in{
      type master;
      file "master/master.example.com";
    };
    
  2. Create the zone file we just promised named (/var/named/master/master.example.com, hint: you need to create the directory first.)
    $TTL    86400 ; 24 hours could have been written as 24h or 1d
    ; $TTL used for all RRs without explicit TTL value
    $ORIGIN example.com.
    @  1D  IN  SOA ns1.example.com. hostmaster.example.com. (
                                  2002022401 ; serial
                                  3H ; refresh
                                  15 ; retry
                                  1w ; expire
                                  3h ; minimum
                                 )
           IN  NS     ns1
           IN  MX  10 s01
    
    ; server host definitions
    ns1    IN  A      10.1.1.40  ;name server definition
    www    IN  A      10.1.1.20  ;web server definition
    ftp    IN  CNAME  s01.example.com.  ;ftp server definition
    
    ; non server domain hosts
    w01   IN  A      10.1.1.10
    s01   IN  A      10.1.1.20
    
  3. Tell the named service to re-read it's config file
    systemctl reload named
    
  4. Check that the config file was reloaded without error
    systemctl status named
    
  5. Check our work from s01
    1. Look up ns1
      nslookup ns1.example.com
      
    2. Look up ns1 without the ".example.com" (this is expected to fail)
      nslookup ns1
      
        What happened? Answer
        How can we "fix" this? Answer

Part D: Reverse Lookup

It's nice to be able to go from name to IP, but sometimes we also need to be able to go from IP to name (often for security checks), to do this we need a reverse look-up zone.

  1. Tell named that we will provide reverse lookups for 10.1.1.0/24
    zone "1.1.10.in-addr.arpa" in{
      type master;
      file "master/10.1.1.0.rev";
    };
    
  2. Create the zone file we just promised named
    $TTL	86400 ; 24 hours, could have been written as 24h or 1d
    @    IN	 SOA  ns1.example.com.	hostmaster.example.com. (
    			      2002022401 ; serial
    			      3H ; refresh
    			      15 ; retry
    			      1w ; expire
    			      3h ; minimum
    			     )
    ; Name servers for the zone - both out-of-zone - no A RRs required
           IN  NS ns1.example.com.
    ; server host definitions
    40      IN  PTR    ns1.example.com.
    ; non server domain hosts
    10	IN PTR		w01.example.com.
    20	IN PTR		s01.example.com.
    
  3. Test our work from s01
    nslookup 10.1.1.40
    
    dig -x 10.1.1.10