We will build the infrastructure required to perform automated network based installation and initial configuration of RHEL nodes. The techniques and technologies we will practice don't just apply to RHEL. Every major UNIX O/S has an automated installation and configuration process. Most use the same tools, all use the same concepts.
Relax and take a deep breath, it's time to dive back into Linux. This lab will require you to call upon the Linux administration skills you already know and to build a few new ones.
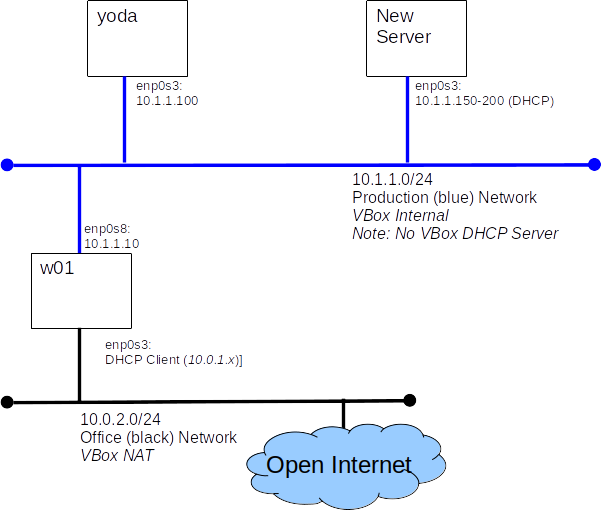
You will build this configuration.
Alice, our friend from the Admin course, has been promoted and now manages the update server. Alice's first decree as all powerful root was to rename y01 to yoda.
Yoda servers as a YUM/DNF server. For our admin course we only needed a few packages. Now we need more. We will format the disk Alice added and mount it at /var/www to make space for all those new packages. Alice has added a disk, it shows as /dev/sdb
cp -a /var/www/* /mnt
rm -rf /var/www/*
UUID=2d8e7f1f-9832-4357-8d00-7a6429783f48 /var/www ext4 defaults 0 1
umount /mnt
mount -a
df
#Run on w01 as root
yum clean all
yum repolist
The RHEL DVD contains two repos: BaseOS and AppStream. We will copy these repos to /var/www/html so that they can be served to clients via http. More accurately we will copy the entire install ISO
mount /RHEL-8-3-0-BaseOS-x86_64
mkdir /var/www/html/83
cp -a /RHEL-8-3-0-BaseOS-x86_64/* /var/www/html/83
restorecon -R /var/www
To install Linux over the network we need a DHCP server that we control. Fortunately a lovely DHCP server is included with most Linux distributions including RHEL.
df /RHEL-8-3-0-BaseOS-x86_64/
yum install dhcp-server
systemctl enable dhcpd
systemctl start dhcpd
Job for dhcpd.service failed because the control process exited with error code.
See "systemctl status dhcpd.service" and "journalctl -xe" for details.
The dhcp server needs to be told what sub-nets to manage or it won't start. While we are editing the dhcpd.conf file, we will also add the bits we need to support PXE-boot.
#
# DHCP Server Configuration file.
#   see /usr/share/doc/dhcp-server/dhcpd.conf.example
#   see dhcpd.conf(5) man page
#
option space pxelinux;
option pxelinux.magic code 208 = string;
option pxelinux.configfile code 209 = text;
option pxelinux.pathprefix code 210 = text;
option pxelinux.reboottime code 211 = unsigned integer 32;
option architecture-type code 93 = unsigned integer 16;

subnet 10.1.1.0 netmask 255.255.255.0 {
	option routers 10.1.1.1;
	range 10.1.1.150 10.1.1.200;

	allow bootp;
	allow booting;

	# tell PXE client where to look for next file
	next-server 10.1.1.100;

	# tell PCS client what file to load next
	filename "pxelinux.0";
}
systemctl start dhcpd
firewall-cmd --permanent --add-service=dhcp
firewall-cmd --reload
Network based installation uses the Trivial FTP service (tftp) to download boot code.
TFTP is a very simple file transfer protocol that uses UDP on port 69 to serve files. By convention TFTP serves files from the /tftpboot directory.
yum install tftp-server
yum install tftp
systemctl enable tftp.socket
systemctl start tftp.socket
firewall-cmd --permanent --add-service=tftp
firewall-cmd --reload
echo "hi tftp works!" > /var/lib/tftpboot/f1
curl tftp://localhost/f1
Put the files our client needs to boot in the correct places.
cd /var/lib/
rpm2cpio /RHEL-8-3-0-BaseOS-x86_64/BaseOS/Packages/syslinux-tftpboot-6.04-4.el8.noarch.rpm | cpio -imudv
mkdir /var/lib/tftpboot/pxelinux.cfg
default vesamenu.c32
prompt 1
timeout 5

display boot.msg

label linux
  menu label Install system
  menu default
  kernel images/RHEL-8.3/vmlinuz
  append initrd=images/RHEL-8.3/initrd.img ip=dhcp inst.repo=http://10.1.1.100/83 ks=http://10.1.1.100/Kickstart/default.ks inst.kdump_addon=off
label rescue
  menu label Rescue installed system
  kernel images/RHEL-8.3/vmlinuz
  append initrd=images/RHEL-8.3/initrd.img rescue
label local
  menu label Boot from local drive
  localboot 0xffff
mkdir -p /var/lib/tftpboot/images/RHEL-8.3/
cp /RHEL-8-3-0-BaseOS-x86_64/images/pxeboot/initrd.img /var/lib/tftpboot/images/RHEL-8.3/
cp /RHEL-8-3-0-BaseOS-x86_64/images/pxeboot/vmlinuz /var/lib/tftpboot/images/RHEL-8.3/
With the infrastructure we have build so far we could perform network based installations, but we would still have to answer the set-up questions. This is bad, not only is it time consuming but it is prone to errors and inconsistencies. Kickstart to the rescue. Kickstart is RHEL way of supplying answers to the installer's questions from a file.
We will build a simple Kickstart file and publish it via httpd.
mkdir /var/www/html/Kickstart
#
# Sample Kickstart file for COMP-10032
#
# james, summer 2022
#

#version=RHEL8

# install from the command line with no interaction
cmdline

# agree to RHEL end user legal agreement :(
eula --agreed

# install from yoda repo
url --url=http://10.1.1.100/83/BaseOS

# include the AppStream repo from yoda too
repo --name="AppStream" --baseurl=http://10.1.1.100/83/AppStream

%packages
@minimal-environment
nano
bc
bash-completion
%end

# Keyboard layouts
keyboard --xlayouts='us'

# System language
lang en_CA.UTF-8

# Network information
network  --bootproto dhcp

# storage configuration
#

# use only sda
ignoredisk --only-use=sda

# remove any existing partitions
clearpart --all --drives=sda

# a classic partition for /boot
part /boot --size=500 --fstype=ext4

# Use the rest of the disk for LVM, leaving some free PE
part pv.01 --size=1 --grow
volgroup VG01 pv.01
logvol swap --recommended --vgname=VG01  --name=LV_swap
logvol / --vgname=VG01 --size=1000  --fstype=ext4 --name=LV_root
logvol /usr --vgname=VG01 --size=2500  --fstype=ext4 --name=LV_usr
logvol /tmp --vgname=VG01 --size=200  --fstype=ext4 --name=LV_tmp
logvol /var --vgname=VG01 --size=500 --fstype=ext4 --name=LV_var
logvol /home --vgname=VG01 --size=200  --fstype=ext4 --name=LV_home


# System timezone
timezone America/New_York --isUtc

# Root password (adminpass)
rootpw --iscrypted $6$iUoPTAnSZ6Rv4RHQ$lmzXSayAdj4VeWvkGt6VYJ0nLacw.rOQWpmJ2dE1iOn6XjS/kcGtW8qeG6RHMJtNgdVbi00CqpOPb3g8lCZYd.

reboot

# Set the passwd policy.
# This is a feature of the AnacondaUI, so it must be enclosed with an %anaconda ... %end block
#
%anaconda
pwpolicy root --minlen=6 --minquality=1 --notstrict --nochanges --notempty
pwpolicy user --minlen=6 --minquality=1 --notstrict --nochanges --emptyok
pwpolicy luks --minlen=6 --minquality=1 --notstrict --nochanges --notempty
%end

# Lines in the %post block will be executed by the shell after installation
#
%post

# we will manage our own repos thank-you
subscription-manager config --rhsm.manage_repos=0

# configure bash the way james likes it ;)
cat >/root/.bashrc <<EOF
if [ -f /etc/bashrc ]; then
	. /etc/bashrc
fi
set -o vi
alias lt='ls -lrt'
alias hg='history | grep'
EOF

%end
All the ground work is done - it's time to build a server. "Look Ma' no hands!"
Now we get to see how easy it is to modify our installation settings, and build some more servers.
You may want to review the Kickstart documentation found in Notes and Reference Material
We will need yoda for all of our labs and test. If you built yoda on a classroom computer, you will need to make sure that you copy the contents of the VirtualBox VM folder to you your external drive. The folder you want is VirtualBox VMs/yoda(10.1.1.100). Double clicking on the yoda(10.1.1.100).vbox file contained in this folder should register the yoda VM with VirtualBox on any new host.